A bollard line can look simple on a plan and still become a margin problem in the field. The product may be precast, but the work still involves foundation design, utility clearance, lifting, alignment, anchors, cure time, and the performance standard behind the specification. If those details appear only after bid day, your labor allowance is already exposed.
The practical rule is simple: time savings is money savings. Find the project early, identify the actual threat level, confirm how the units will engage the foundation, and price the installation method rather than guessing from the product description. Contractors who treat precast concrete bollards as a complete system, not just a heavy vertical object, protect both schedule and profit.
Table of Contents
- Winning Bollard Projects with Smarter Preconstruction
- Decoding ASTM Standards and Crash Ratings
- Comparing Installation Methods and Labor Costs
- Material Specifications and Foundation Realities
- Decorative Perimeter Control vs Hostile Vehicle Mitigation
- Securing High-Margin Site Work Opportunities Early
- Final Pre-Bid Verification Checklist
Winning Bollard Projects with Smarter Preconstruction
A tight site-work bid rarely fails because an estimator can't find the bollard itself. It fails because the documents don't make clear whether the units are decorative, traffic-control elements, or part of a tested vehicle-security system. The same uncertainty can affect excavation, reinforcement, anchors, equipment, concrete placement, traffic control, and return visits.
Start by locating the opportunity before the scope becomes a commodity bid. Early project intelligence helps a contractor identify active site-work and hardscape work, review the likely decision-makers, and decide whether the job fits the firm's trade, territory, and capacity. That lead time gives estimating and operations a chance to ask questions while the design can still change.
For a practical planning workflow, use preconstruction planning guidance to organize the work before drawings reach the final pricing cycle. Then use the Estimate tool to turn the known scope into a workable price instead of rebuilding the same quantity and labor assumptions from scratch.

What to establish before pricing
Read the civil, architectural, structural, and security sheets together. A bollard detail on one sheet may depend on a footing, slab thickening, drainage assembly, or waterproofing condition shown elsewhere.
- Define the function: Determine whether the bollards guide traffic, protect pedestrians, prevent parking encroachment, or stop an intentional vehicle impact.
- Trace the foundation: Identify whether the design uses a new footer, an existing slab, a steel pipe, anchor bolts, or a socketed arrangement.
- Mark conflicts: Check utilities, drainage, irrigation, electrical duct banks, waterproofing, and finished-grade transitions before allowing excavation.
- Price the sequence: Include layout, delivery, unloading, lifting, drilling or excavation, anchoring, cleanup, inspection, and any cure-related return trip.
- Confirm tolerances: Establish the acceptable line, spacing, elevation, and orientation before the crew mobilizes.
The best bid isn't just the lowest material number. It's the number that reflects the installation the drawings require. A preconstruction review that catches one foundation conflict can save more than a small material discount because it prevents rework, idle labor, and a schedule dispute.
Decoding ASTM Standards and Crash Ratings
A bollard can look substantial on a drawing and still fail to meet the project's security requirement. Contractors need to read the crash rating before pricing the foundation, reinforcement, spacing, and installation sequence.
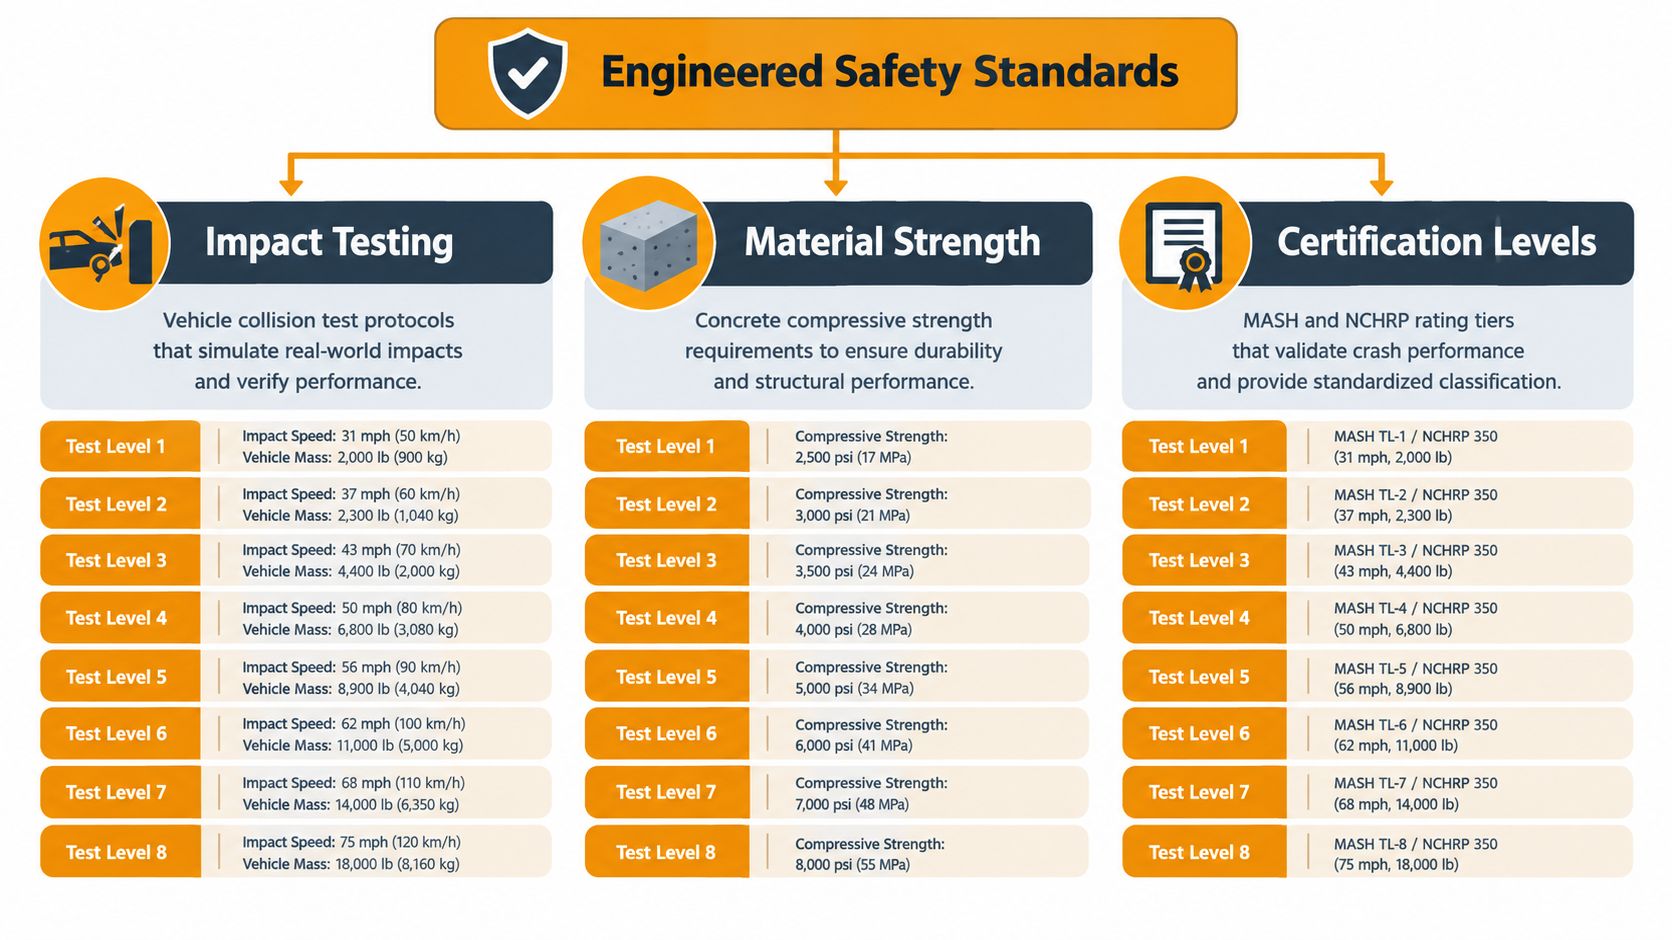
In 2009, ASTM introduced ASTM F2656, replacing the older U.S. Department of State perimeter-barrier test standard with a repeatable method for comparing vehicle-barrier performance across threat levels. Its penetration classes include P1 at 1 meter or less, P2 from 1.01 to 7 meters, P3 from 7.01 to 30 meters, and P4 at 30 meters or more. These classes measure dynamic penetration after impact. They do not only indicate whether the bollard remains standing. (ASTM bollard testing background)
Read the rating before you read the product finish
For high-security work, the M50 designation replaces the earlier K12 category in New York State security-bollard specifications. The test uses a 15,000-pound vehicle traveling at 50 mph, with a P1 result requiring dynamic penetration of 3.3 feet or less. (New York State security-bollard specification) A related New York document identifies the same 15,000-pound, 50 mph test basis and P1 penetration threshold for M50/K12-level protection. (ASTM F2656 M50 test reference)
That rating changes the bid. A contractor cannot select a standard precast unit, enlarge the footing by guesswork, and describe the finished assembly as crash-rated. The tested bollard, foundation, spacing, quantity, reinforcement, and connecting elements must match the approved system. Any mismatch can create a submittal rejection, redesign, or unplanned return to the site.
For lower-speed and smaller-vehicle exposure, ASTM F3016 tests impacts at 10, 20, and 30 mph for vehicles up to 5,070 pounds. It applies to conditions such as parking garages, storefronts, campuses, and pedestrian areas where the design threat differs from a heavy-truck perimeter attack. (ASTM F3016 and F2656 overview)
Ask three questions on every submittal
- What vehicle and speed were tested? Appearance does not establish the test basis.
- What penetration class was achieved? The P classification identifies how far the vehicle entered the protected area.
- What installation assembly was tested? Request the foundation, spacing, reinforcement, and connection details, not only a product cut sheet.
Practical rule: A crash rating belongs to the installed system, not an isolated bollard in a supplier's yard.
Comparing Installation Methods and Labor Costs
On a live paving or access-control project, the fastest bollard installation can still become the most expensive line item if the slab, footing, or sequence is wrong. Installation method affects production speed, lateral-load transfer, pavement disturbance, alignment control, and the chance of a second mobilization. Price the method against actual site conditions, not the unit alone.
Three approaches appear regularly in precast work. Embedding rebar extensions into fresh concrete gives the bollard direct engagement with a new footer, but requires coordinated reinforcing, forming, placement, and curing. Drilling and anchoring into an existing slab can reduce demolition and avoid a new concrete pour. Its result depends on slab thickness, reinforcement location, hole cleanliness, adhesive, anchor installation, and the specified hole pattern. A third option mounts the precast unit over a separately embedded steel pipe, separating the below-grade structural element from the visible bollard.
The following comparison uses the published production and cure ranges in Bollard installation time guidance.
| Method | Time Per Unit | Cure Wait | Best Application |
|---|---|---|---|
| Surface mount with drilled anchors | 25 to 45 minutes | No cure wait | Existing slabs where the substrate, anchor layout, and access are suitable |
| Embed rebar extensions into fresh concrete | 60 to 90 minutes | 24 to 72 hours | New construction with a designed footer and planned concrete sequence |
| Mount over a separately embedded steel pipe | Project-specific | Depends on the pipe footing and surrounding work | Sites needing a distinct structural insert and controlled visible-unit replacement |
Surface mounting saves time only when the slab supports it
Surface mounting may be the quickest choice because the crew avoids excavation and a new cure period. That saving disappears when the slab is too thin, cracked, heavily reinforced in the wrong location, exposed to uplift, or unable to accept the specified anchor pattern. Drilling also adds dust, noise, and possible waterproofing concerns over occupied areas or structured parking.
Use a concrete cost estimating tool to separate direct installation labor from demolition, patching, drilling, adhesive, equipment, and return-trip allowances. A short per-unit duration does not guarantee a low installed cost. Restricted access, live traffic, night work, or difficult material handling can dominate the estimate.
Embedded work needs a sequence, not just a hole
Fresh-concrete embedment works when the footer is designed, reinforcing steel is coordinated, and the bollards are set before the concrete fixes their position. Crews need a setting template, reliable lifting points, stable staging, and a line-and-elevation check while the concrete remains workable. Small alignment errors become expensive after the pour.
The cure period also affects paving, striping, access, and turnover. If those activities depend on the footing reaching the required condition, include the wait in the schedule and labor plan rather than treating it as idle time.
A steel-pipe system can suit projects where the structural insert and visible precast element have different maintenance or replacement requirements. It still requires accurate pipe placement, adequate footing engagement, and a connection detail that transfers the expected forces. Whichever method appears on the drawings, carry the foundation, tolerances, access, equipment, and likely return visit in the bid.
Material Specifications and Foundation Realities
A precast bollard's body needs a durable mix and reinforcement, but those specifications don't compensate for a weak or incorrectly built foundation. Typical published requirements call for minimum compressive strength around 5,200 psi, or 36 MPa, with Grade 60 deformed rebar to improve resistance to chipping, wear, and handling damage. The same specification identifies ASTM C150 Type I or III cement and ASTM C33 aggregate, showing that durability depends on the complete mix and reinforcement detail, not on the word “concrete” alone. (Precast bollard material specification)
The body and the connection carry different responsibilities
Concrete provides compressive capacity. Reinforcement helps the unit tolerate tension, handling, localized damage, and repeated service stresses. The footer, anchors, rebar extensions, and surrounding soil then determine how impact or lateral loads move into the ground.
A technical product drawing describes two common arrangements: embed 6-inch rebar extensions into fresh concrete, or drill and anchor into an existing slab with construction adhesive using a template to align the holes. (Precast bollard installation drawing) The drawing is useful for understanding the connection concept, but it isn't a substitute for the project's structural design. The crew still needs confirmed slab conditions, reinforcement clearance, embedment, adhesive requirements, and inspection criteria.
Foundation engagement controls field performance
Precast foundations can accelerate installation, but joints, shear transfer, lifting points, groundwater, and soil conditions require active control. A footing that looks adequate on paper may perform poorly if the soil is disturbed, water enters the excavation, the joint isn't detailed correctly, or the unit is set out of tolerance. Those problems often show up as alignment complaints first, but they can also undermine the intended barrier behavior.
Field standard: Verify the foundation detail before the truck arrives. Moving a heavy precast unit is easy compared with correcting a foundation that was placed in the wrong location.
Crash-rated work adds a strict requirement. The WBDG crash-resistant bollard guidance states that the field barrier must replicate the tested foundation, bollard spacing, number of bollards, and beam lengths for the rating to remain valid. A crew that changes spacing to avoid a utility, substitutes a shallower footing, or omits a tested connection may have installed a strong-looking product, but not the tested system.
For estimating, use a structured material take-off workflow that separates bollard units, reinforcement, concrete, anchors, excavation, lifting, backfill, drainage, testing, and restoration. That breakdown gives the project manager something useful to verify during procurement and installation.
Decorative Perimeter Control vs Hostile Vehicle Mitigation
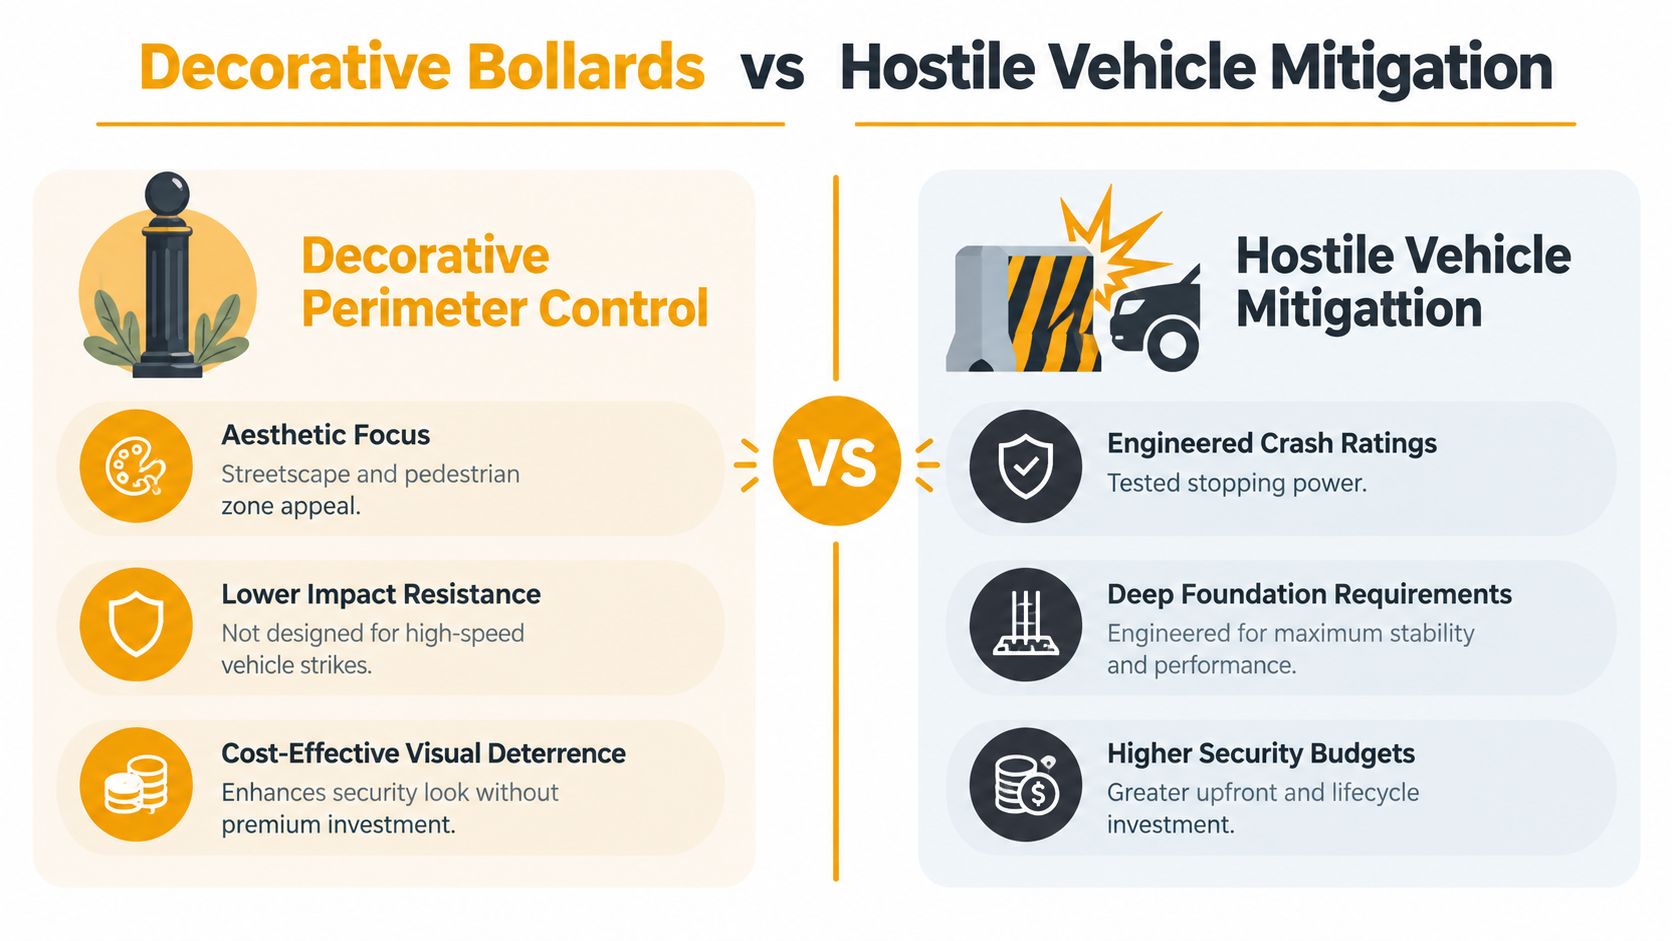
Concrete bollards aren't interchangeable. A decorative unit can define a pedestrian edge, discourage casual vehicle encroachment, and support a streetscape. A hostile-vehicle-mitigation system must demonstrate tested stopping performance through a complete assembly, including the foundation and layout.
That distinction matters because product descriptions often emphasize low maintenance, visual presence, and use around parking lots, sidewalks, and entrances. Those are legitimate applications, but they don't establish resistance to a defined vehicle mass and speed. If the plan calls for protection at a government facility, airport, stadium, or another sensitive site, the estimator needs the security specification and test documentation before choosing the product.
Use the application to set the performance question
For decorative perimeter control, ask whether the bollards need to define space, protect a storefront from routine low-speed contact, manage parking behavior, or reinforce pedestrian separation. The answer may support a conventional precast unit with an appropriate anchor or footer.
For hostile vehicle mitigation, ask what vehicle, speed, penetration limit, spacing, foundation, and connection the security consultant or owner requires. A standard unit is not adequate just because it is heavy. The project needs a tested and engineered system that can be installed in accordance with the test configuration.
A useful bid split looks like this:
- Visual control: Focus on appearance, durability, placement, maintenance, and ordinary site impacts.
- Vehicle protection: Focus on crash testing, penetration class, foundation design, spacing, installation verification, and liability.
- Mixed-use perimeter: Separate zones on the plan so a decorative product isn't accidentally carried into a protected approach.
Independent industry coverage indicates growing attention to crash-rated precast bollards at high-security sites. One 2026 market summary projects the concrete security bollard market at USD 2.54 billion by 2032, citing USD 1.56 billion in 2026 and an 8.49% CAGR. That is a projection, not a guarantee of demand for every contractor, but it reinforces the need to distinguish ordinary perimeter work from engineered security work. (Concrete security bollard market projection)
A good-looking bollard can control movement. Only a documented, correctly installed system can support a crash-rating claim.
Securing High-Margin Site Work Opportunities Early
Bollard work becomes harder to price profitably after the bid has already attracted every competing installer. At that point, the drawings may be incomplete, the owner may expect a quick number, and the estimator has little time to resolve whether the scope is decorative or security-critical.
Early pipeline visibility changes the conversation. A contractor can review permits, plan reviews, plats, and owner records while the site layout and security approach are still developing. That creates time to identify the owner, applicant, engineer, general contractor, or civil team and ask the questions that later become change orders.
Qualify the project before you chase it
A useful lead isn't merely a project address. It needs to fit the contractor's trade, territory, valuation range, schedule, access requirements, and capacity. Automated lead scoring can remove mismatched opportunities and prioritize work where the decision-maker is reachable.
Platineer currently provides this type of construction intelligence in Houston, Austin, and Dallas–Fort Worth, with onboarding across additional major U.S. metropolitan markets. Its workflow combines early project signals with status context, so a specialty contractor can distinguish a project in planning from one already locked into a late bid cycle.
The timing advantage is especially important for larger developments. Early-pipeline subdivisions and commercial projects can surface 6 to 18 months ahead of permit bursts, giving business development and preconstruction teams time to study the plans, develop a foundation allowance, and build a relationship before the scope becomes a lowest-number exercise.
Turn early information into a better proposal
Early contact shouldn't mean sending a generic capability statement. Use the project information to prepare specific questions:
- Is the bollard line decorative, traffic-control, or crash-rated?
- Does the civil design show a new footer or an existing slab installation?
- Are utilities, waterproofing, and drainage coordinated with the proposed spacing?
- Who owns the security decision, and who controls the final submittal?
- Can the contractor provide a tested foundation and installation detail?
A Render tool can also help generate site visuals in seconds, which gives an estimator or business-development manager a clearer way to discuss placement, access, and streetscape impact with the project team.
The commercial value is practical. Early visibility gives you time to identify scope gaps, request clarification, reserve installation capacity, and price the work around a method that can be executed. That is how a contractor protects margin before the rush begins.
Final Pre-Bid Verification Checklist
Before submitting the number, verify the bollard scope in the order the field will encounter it: function, product, foundation, installation, logistics, and schedule.
Confirm the threat level. Classify the work as decorative perimeter control, routine vehicle protection, or hostile-vehicle mitigation. Price a system that matches the documented requirement.
Verify the submittal. Check material, reinforcement, dimensions, anchors, and ASTM test documentation. For a rated system, confirm the tested vehicle, speed, penetration class, foundation, spacing, and connection arrangement.
Match the foundation. Compare the detail with geotechnical information, slab conditions, groundwater, soil, joints, and finished grades. Confirm that embedment or anchors will not conflict with utilities or reinforcement.
Choose the installation method. Price surface mounting, fresh-concrete embedment, or a steel-pipe arrangement against actual site conditions. Carry templates, adhesive, drilling, excavation, lifting, concrete, backfill, patching, and inspection.
Check the sequence. Surface-mounted work may avoid cure waiting, while embedded installations can require 24 to 72 hours of curing after 60 to 90 minutes per bollard of installation time. (Bollard installation time guidance) Confirm that the delay fits paving, striping, access, and turnover.
Confirm field tolerances. Set line, spacing, elevation, orientation, lifting points, and the inspection hold point before delivery. Resolve unclear tolerances before labor and equipment are committed.
Carry the complete cost. Include freight, unloading, equipment, labor, restoration, traffic control, return trips, and contingency for confirmed unknowns. A low unit price will not protect a bid that omits foundation work.
Platineer helps contractors find earlier construction opportunities, qualify them by trade and territory, and organize estimating before bollard scopes become rushed commodity bids. Visit Platineer to explore project intelligence, Estimate, and Render tools for planning and pricing precast concrete bollard work with better field awareness.